


Part 1
To take better shots, you need to understand a little bit about light, how a camera captures a photograph, and what sort of factors can affect your final result. I won't go into the tiny details of how these works (if you're really interested there are many detailed guides on how cameras work online), but instead will go over the very basics that you need.
An image is very simply a reflection off a surface; for example, when light hits a tree, any light reflecting off the leaves is green, while any light reflecting off the trunk is brown. A camera is basically a closed box; when you take a photo, a small hole (called the shutter) opens up for a short period and closes again allowing light in; the reflections of light enter the box, and fall on a wall (film) where the image is created. 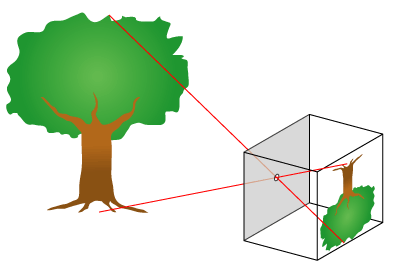
The image would appear bright or dark depending on how much light actually enters the camera and falls on the film, and this is controlled by two variables:
1- Size of the shutter opening, called the aperture (ie, larger opening = more light = brighter picture)
2- Time shutter is kept open for (ie, longer period = more light = brighter picture)
Now, how does this affect you as an average camera user? Most of the modern cameras today try to automatically detect how much light there is in the photo you want to take, and change the above variables to come out with a good picture. In some situations, this works out fine, but in others the camera doesn't correctly detect the right setting:
In this example, the camera senses a lot of light (coming from the sun/sky), so it automatically sets a fast shutter speed and/or a small aperture. This works fine for the sky, but unfortunatey the building, which doesn't give off any light of it's own, looks dark and the colors don't show clearly:
Another example is this shot, taken in a dark room. The camera should increase the aperture/take a longer shot, but because of the amount of sunlight coming in from the windows, it automatically assumes there is a lot of light and takes a dark (underexposed) photo instead:
This is a typical problem when taking photos of a regular object infront of a bright background. Most automatic cameras cannot differentiate the bright and dark spots in a photo, and almost always base their settings on the brightest area in the scene.
Solution? Well, the most obvious is you can avoid shooting subjects infront of a light background, to avoid underexposure.
Of course, you could play around with the different modes/settings on your camera and figure out what works best for your photo. Now, my assumption is that most people don't bother to read the manual/booklet that comes along with their camera (put your hands up if you're one of those people), and so they end up using the Auto Mode on their cam:
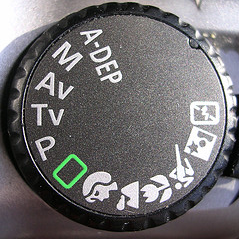
Most modern cameras come with a bunch of settings that look a little like this (the symbols might look different depending on the make of the camera, or it could be a setting on the LCD screen rather than a wheel, and so on). The easiest one to use is Auto (green rectangle here), as it sets up everything for you according to the amount of light it can sense. There are a few so called 'creative' modes, which adjust the settings for specific situations (ie, the running man is for capturing sport shots, so it uses a fast shutter speed to capture runners, cars, etc without blur, and so on). I'm not very keen on using these modes, as I prefer having full control of my shots, but you can play around with them and see what you can do with each one.
More useful is the P setting. It gives you the option to change some of the settings, while still keeping automatic control of things like shutter speed, and so on. The M setting gives you full control of all the features of the camera. I'll go over these in the next post.


4 comments:
useful, ill be reading the rest of your guides :)
Thanks a lot, I actually learned something!
I don't know that much about photo techniques... I should learn more - or keep on reading your tutorials!
keep them coming :)
enjoying this.
shall go and retrieve my Canon from the bin now.
Post a Comment